


A Change of Plans and Preparation
- Aug 26, 2011
- 8 min read
I have decided instead of going straight up to Barber's Vintage festival I am going to make a small detour. I was going to ride alone to Pinetta, FL, just inside the Georgia state line and join some friends for the ride from there to Barbers. But hardly after plans were laid, the first "Kickstart Classic" was announced and I decided I had to be a part of it. The Kickstart is organized by Wheels Through Time Museum in Maggie Valley, Road Bike, and American Iron magazines. A kickstart bike is required to ride at the front of the pack on this ride, and Old Faithful qualifies.
The ride is leaving the museum on the sixth of October and will stop in Rome, Georgia, the first day, continuing on to Barbers Motorsports Park in Leeds, Alabama, the next day. Motorcycle Classics magazine is also planning a "Blue Ridge Rendezvous" that will end at Wheels Through Time the day before the Kickstart Classic, so the assumption is that some of those riders will continue their ride with us to Barbers.
The detour to Maggie Valley only adds a few hundred miles to my ride to the festival, but what's a few hundred miles to a "Road Dog"? It will be a great opportunity to meet some of the writers and editors at those magazines and the ride follows the ridge of the Appalachians all the way to Leeds, so it ought to be a beautiful ride among a lot of cool old bikes.
Once at Barber's, I will camp with my friends coming up from Pinetta, ride back down as far as north Florida with them, and then on home alone to Lake Wales on Monday, the tenth. I may have a few books with me to sell at the swapmeet at the festival, so look me up if you want a copy. I'll be stationed at the H-E-L USA booth, when I'm not tearing up the hills around Leeds on my scoot.
With the coming ride in mind, I have turned my attention to the CB350. I started a little project to build a kind of "sissybar" for the CB. When fully loaded, the tent and sleeping roll on the back of the saddle is cranked down and back hard with bungees, and this pulls the tailbag back so that it looks like it's falling off the back of the rack. It is secure, but I hate looking so disheveled, so I started brainstorming.
Laying Out the Sissybar

The stock rack has an upright flat bar on both sides at the front, and these are drilled with two square holes on each. Hmmm, it looked just like carriage bolts should be there. I bought some 1/2" conduit, the outside diameter of which matched the stock rack almost exactly (5/8"). I bought a bender and unelegantly bent a "U" in the tubing. I cut the ends to length and squished the four inches of the ends flat in my woodworking vise. I clamped this to the rack and marked for holes; 1/4" carriage bolts, it turns out, fit perfectly. I drilled the matching holes and bolted the contraption to the rack—a little uneven in the bend, but serviceable.
Squishing the Ends to Form a Flat Four Inches where the Bolts will Go

Marking the Spots to Drill the Mounting Holes

The sissybar sticks about eight inches above the rack and is solid. When mounted, it will keep the bags from pushing the tailbag off the back. I bought some 3" flat stock, marked it, and cut a crosspiece that is to be welded across the sissybar to strengthen it and give me a something to which I can attach a padded backrest. The crossbar will also give me more attachment points for bungees.
The Sissybar Bolted in Place

I got out my little 120 volt welder that someone had given me a while ago, and with all kinds of self-confidence, started to weld. After an hour and a half of failure, and with my body almost devoid of water through sweating in my little oven of a garage, I gave up and ground the ugly results of my attempt off the bar. A friend has promised to fix my chain guard, which has similarly failed from my lack of welding skills, on Saturday, so I will leave it up to him to put the plate on while he is here.
I have a minor concern because last time I changed the oil and cleaned the filter I saw a bit of tiny flakes of what looks like aluminum in the filter and oil. I am not overly concerned, however, because when I recently replaced all the gaskets from the head up on this motor, I did a lot of surface smoothing on a granite plate, and with a diamond stone where I could not use the plate, where the mating surfaces came together. All I may be seeing is stuff I didn't get washed off well enough before reassembling the motor. The motor has been humming along and showing no signs, or making any noises, to indicate there is any internal problem. I will take the bike for a good ride and then immediately drain and replace the oil, hoping to flush any of the remaining flakes out and then keep careful inspection to make sure they are truly gone.
The recent retorquing of the cam case cover was a success, and I have seen no signs of more oil leaking. The lower oil leak I had as a result of my clutch shaft seal has been repaired and a new seal sits nicely in its place beside the drive gear now.
The engine finally being nice and dry, I turned my attention to tuning the bike. I pulled both carbs, disassembled them, and gave them a good soak in cleaner, sprayed them dry, and reinstalled them. The throttle lock nut on the port (left side for you land lubbers) was not tightening and I fixed that with a light squeeze by a pair of pliers applied to the cable attachment arm. The arm is tapped and has a slit to allow the cable to pass through. I simply closed that gap very slightly, and now the lock nut does its job properly.
Next, I pulled the points cover and worked on refining the timing. Here's where it got messy. The static timing with my ohm meter went easily enough, but the little lug on the left points was barely attached to the wire. I pulled the pigtail going from coils to points and removed the lug, bending the little tabs out that hold the wire. While bending the tabs back, I broke one completely off, and I could tell the other was about to follow suit.
I sloppily restripped the end of the wire, laid it on the lug, and oh so gently bent the remaining lug over it. Out came the soldering iron and solder, and in way too long a time I had a junction of wire to lug that held—barely. I crossed my fingers, reattached the pigtail to the points, and plugged the other ends into the coil wires. There were some tiny orphan frays sticking out from my mess of a soldering job which wanted to caress the ground side of the points. A little wiggling around of the wire and testing with the ohm meter, and I finally had no continuity between the lug side and the ground side of the points. I crossed my fingers, held my tongue just right, said a little prayer, and closed up the points cover. I clicked on the key, saw the neutral light glowing green, hopped on, and gave her a kick. The little motor roared to life.
It was one of those things. I couldn't be the only one who's done a half-assed job of something, and because it went back together without sparks flying or anything exploding, assumed it was "fixed." In my heart I knew better, but I fired Old Faithful up anyway for my Thursday night ride. I almost had myself fooled that I had fixed it by the time I got a half mile away and nothing had gone wrong, but then it happened. The left side quit firing. No, wait. It started firing again. I stopped and checked my fuel. It was dark in there and I couldn't see a thing. All I could hear was the swish-swash of gas flowing back and forth. It couldn't have been my fine workmanship failing; the bike must have been going on reserve. I flipped over to reserve, stopped at the gas station, and filled up. I continued on my way, with periodic hesitation from the left side. "It must be the float chambers are not filled all the way yet," I lied to myself. I got as far as my dinner stop, just a few miles before home, when I had to admit my repair had gone south. I would have to baby her home and hope for the best.
This morning I pulled the points cover and the pigtail again, determined to do it right. I found a ring terminal, properly trimmed and restripped the left point wire, slid some shrink wrap on the wire and slid the freshly exposed bare wire into the terminal. I heated the joint up properly and touched it with the solder and watched it pulled up into the connector making for a clean and solid connection.
I slipped the shrink wrap up all the way to the ring, and held a lighter under it until it was tight against the wire and fitting. This is important as it prevents any part of the terminal from grounding against the points backer or ground side of the points themselves.
Points Problem, ummm, Points
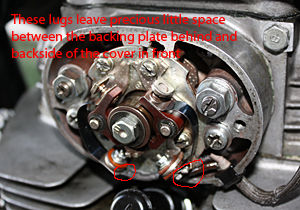
I might mention, for any of you out there with one of these old Hondas, this is one area that is ripe for failure from the get-go. Even with the stock terminals on the end of these wires there is very little clearance between where the wire attaches and the points' back plate and inside of the points cover. If the terminal spins at all while tightening the wire, it will touch somewhere.
This can happen also from the little nuts vibrating loose. If the terminal touches the plate on the backside, at least you will know it because you can see it, but often it will contact the back of the cover once it is reinstalled, and you will never know it. You might have thought you had everything right, but one side or the other still will not fire. You might end up chasing your tail looking for another cause for the problem—maybe it wasn't the points! Maybe it is a fuel problem. Maybe the coil is bad. Maybe the plug is fouled. I missed all but one day of Daytona Bike Week one year because of this and only discovered what the real problem was once I got the bike home, via the back of my brother-in-law's pickup truck. That was a bummer, but now you know, and this will never happen to you, right?
This time my fix was a success. The bike fired up and ran well. The final proof will be on my next ride but I do not have that nagging doubt of poor workmanship in the back of my mind that I had last time.
Finally, I pulled the bolt on the left head and fired the bike up, watching for oil pumping solidly out of the hole. It did and I promptly turned Old Faithful off. You can see the head of this bolt in the picture in the upper right corner. This is a very handy tool for making sure oil is making it all the way into the cam case. I even managed to not make a mess of the oil running down the side of the motor by preparing for the oil surge by stuffing paper towels all around under the test hole.
I ought to be good to go for the ride now. The only other thing I will do before leaving is pulling the wheel and inspecting the brakes.
Road Dog
"Ride Your Own Ride."


Comments